Installing solar panels on your roof is one of the best ways to reduce electricity bills and use clean energy from the sun. Many homeowners think solar installation is very complicated, but with the right guidance, it becomes much easier to understand.
This beginner-friendly guide explains how to install solar panels on a roof step by step, using simple language. You will learn about tools, safety rules, mounting, wiring, and final checks before turning on your solar system.
What Is a Rooftop Solar Panel System?
A rooftop solar panel system is a setup where solar panels are installed on the roof of a house to produce electricity from sunlight. The system usually includes:
solar panels
mounting structure
solar inverter
wiring and connectors
earthing and safety devices
The electricity produced can be used directly in your home, stored in batteries, or sent to the grid depending on the system type.
Types of Solar Systems Before Installation
Before installing solar panels, you must decide which type of system you want.
On-Grid Solar System
Connected to the electricity grid
No batteries
Excess power is sent to the grid
Lower cost
Off-Grid Solar System
Works without grid connection
Uses batteries for backup
Suitable for power cut areas
Hybrid Solar System
Connected to grid
Includes battery backup
Offers both savings and power backup
Choosing the right system is important before starting installation.
Tools and Materials Needed for Solar Panel Installation
Before installation, keep these tools and materials ready:
solar panels
mounting rails and clamps
drill machine
measuring tape
spanner and screwdriver
safety gloves and helmet
DC and AC cables
solar inverter
earthing rod
Having everything ready saves time and avoids mistakes.
Safety Tips Before Installing Solar Panels
Safety is very important when working on a roof.
Never work alone
Use safety harness if roof is high
Avoid installation during rain or strong wind
Wear non-slip shoes
Turn off main electricity supply
If you are unsure about electrical connections, always consult a professional electrician.
Step 1: Check Roof Condition and Direction
First, inspect your roof carefully.
Roof Strength
The roof must be strong enough to hold the weight of solar panels for 25 years.
Roof Direction
South-facing roofs receive maximum sunlight in many regions
East or west-facing roofs also work but with slightly less output
Shadow Check
Make sure there are no shadows from:
trees
water tanks
nearby buildings
Shadows reduce solar panel efficiency.
Step 2: Measure Roof Area and Plan Layout
Measure the available roof space using a measuring tape.
Decide how many panels can fit
Leave space for maintenance
Avoid overcrowding panels
Planning the layout properly helps in better energy generation and easy servicing.
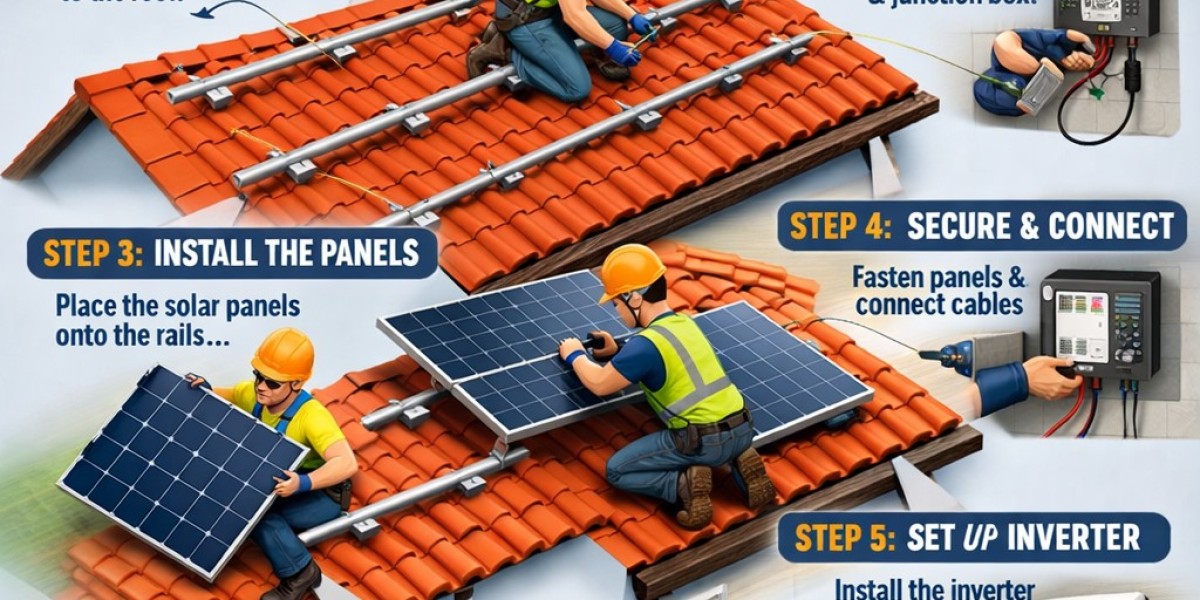
Step 3: Install the Solar Panel Mounting Structure
The mounting structure holds the solar panels firmly.
Installation Process
Mark drilling points on the roof
Drill holes carefully
Fix mounting rails using bolts
Ensure rails are aligned and tilted properly
The tilt angle depends on your location and helps capture more sunlight.
Step 4: Fix Solar Panels on the Mounting Structure
Once the structure is ready:
Lift panels carefully to the roof
Place panels on mounting rails
Secure panels using clamps
Make sure panels are tight and stable
Panels should not move even during strong wind.
Step 5: Connect Solar Panels (DC Wiring)
Now connect the panels electrically.
Panels are connected in series or parallel
Use MC4 connectors
Keep DC cables away from sharp edges
Avoid loose connections
Correct wiring ensures maximum power output and safety.
Step 6: Install the Solar Inverter
The inverter converts DC electricity into AC electricity used by home appliances.
Installation Tips
Install inverter in a shaded and ventilated area
Keep it away from water and dust
Connect DC input from panels
Connect AC output to main distribution board
Different inverters are used for on-grid, off-grid, and hybrid systems.
Step 7: Connect Batteries (For Off-Grid or Hybrid Systems)
If your system includes batteries:
Place batteries in a cool, ventilated room
Connect batteries in correct series or parallel
Use proper cable size
Avoid sparks and loose terminals
Batteries store solar energy for night or power cuts.
Step 8: Earthing and Surge Protection
Earthing protects your system from lightning and electrical faults.
Install earthing rod in the ground
Connect panels, inverter, and structure to earthing
Use surge protection devices
This step is very important for system safety and long life.
Step 9: Net Meter Installation (For On-Grid Systems)
For on-grid systems:
Apply for net meter approval
Electricity department installs bi-directional meter
Excess power sent to grid is recorded
Net metering helps reduce your electricity bill.
Step 10: Testing and System Commissioning
Before turning on the system:
Check all connections
Measure voltage and current
Turn on inverter
Monitor output on inverter display
Once everything is working correctly, your solar system is ready to use.
Common Mistakes to Avoid During Installation
Ignoring shadow analysis
Using low-quality cables
Improper earthing
Wrong tilt angle
Overloading inverter
Avoiding these mistakes improves performance and system life.
Maintenance Tips After Installation
Solar panels need very little maintenance.
Clean panels every 15–30 days
Check wiring once a year
Monitor inverter display regularly
Keep battery terminals clean
Simple maintenance ensures high efficiency for many years.
Can Beginners Install Solar Panels Themselves?
Basic mechanical work can be done by beginners, but:
electrical wiring should be done by professionals
net meter connection requires approval
safety should never be compromised
For small systems, DIY is possible with expert guidance.
Benefits of Proper Solar Panel Installation
Maximum energy generation
Longer system life
Better return on investment
Fewer technical problems
Correct installation is as important as choosing good solar panels.
Final Conclusion
Learning how to install solar panels on a roof helps homeowners understand the process and make better decisions. While professionals are recommended for final electrical connections, knowing each step gives you confidence and helps avoid installation mistakes.
Solar energy is a long-term investment that reduces electricity bills, supports clean energy, and increases property value. With proper planning, safety measures, and correct installation, your rooftop solar system can provide reliable power for 25 years or more.